
I recently discovered a book through Amazon called, "Artisan Bread in 5 Minutes A Day" by Jeff Hertzberg and Zoe Francois. The title intrigued me because I did not thinking bread could be made that quickly let alone "fancy" breads. So I picked up the book from my local library. The book first goes through what the 5 Minute method is, tips and tricks, tools you will need, and suggested troubleshooting methods.
Basically the 5 minute part refers to the time it takes you to shape the dough, slash it, and place it into the oven. What they guide you through making to achieve this goal is a sort of "starter' dough that is left in the fridge for up to 14 days. A traditional starter needs to be cared for and can be very temperamental to the novice baker, but it is also what can produce beautiful nuances in taste and texture in the finished product. The book teaches you to make a very simple base recipe, which can be varied through the book to make other types of 5 minute breads as well. I will not post the recipe here because I like this book and do not want to steal anything from the authors. But here is a basic rundown of the process. There truly is nothing like the smell of fresh baked bread in your house, so I urge you to try this. Even if you are not usually someone who would make homemade bread, I bet you will enjoy this.

The basic ingredients are flour, water, yeast, and salt. Now this makes a batch which is set for 6-8 loaves of bread, depending on the size and what you are making. All of the recipes can be adapted to larger or smaller quantities. For this batch I used a 5 qt plastic container as suggested. Because I have a Kitchen Aid mixer I used it with a dough hook attachment but it is a wet dough so can easily be done in the plastic container it will be stored in. If mixing in the container you will need a wooden spoon, dough whisk, or wet hands. This dough does not, at any step, need to be kneaded. That is one of the many time savers and also why the mixing is only done until a dough forms and all ingredients are mixed together. It may seem wetter than you are used to for bread dough, but for their process to work you must resist the temptation to add more flour.

Once mixed you will then need to let the dough rest in the container, with the lid on, for approximately 2 hours, or until it starts to level off and rise no more. The lid should not be air tight. I used a 5 qt. plastic container from Hefty with a locking lid. It does not seal air tight so still allows for the escape of the gases. Once risen you place the dough in the fridge. It is best not to make your first loaf until the dough has been refrigerated.

When you are ready to make your first loaf take the container out of the fridge. Sprinkle flour onto the top of your dough in one area so that it will make grabbing the dough easier. I used a flour/sugar shaker for the flour and it made it easy for this step and others. You will need to grab out roughly a 1 pound chunk, or the size of a grapefruit.

Use kitchen shears or knife to cut the dough from the container. Then sprinkle some more flour on the dough in your hands and in a circular motion you need to fold the rough edges underneath to create a smooth round disc. In other recipes this may then be shaped into other forms but for now this is the best way to create a nice top surface for your dough. They also refer to this step as "cloaking" because of the very light layer of flour you have sprinkled on it. They suggest this whole step take only 30-60 seconds. Then let the dough rest for about 40 minutes. I put mine on parchment paper for easy transport, but you can also put it on a pizza peel with corn meal for easy maneuvering. The dough may not rise at all during the rest period as mine did not. But it will rise in the oven. The rest period is mostly to help bring the temperature of the dough up a bit and let it settle. 20 minutes into the resting period you should pre-heat your oven and place a broiling pan or some other sturdy metal pan in the bottom rack of your oven. This will be used later for the steam.

Once rested liberally sprinkle flour over the top of the dough. This will create a non-stick surface for your knife to score the bread with. You can score scalloped lines, tic-tac-toe, or cross lines whichever you prefer. Then transport the dough to your baking stone. I use Pampered Chef stones because I LOVE them. However they cannot be preheated in an oven or they will crack. The only difference I saw without the preheating of the stone was that the bottom crust was not as golden and crispy as the top. You can buy baking stones that are meant to go into the oven and preheat them with the oven before baking the bread right on it.

Place the bread into the oven and immediately pour hot water into the metal baking pan. The water will immediately steam so close the oven door as to not lose any of it. The steam is what helps to create a crisp crust on your bread. After baking place bread on a cooling rack to cool completely before eating. Warm bread is so tempting to cut into but by letting the inside steam and heat escape that quickly you will lose a lot of the texture and 'custard crumb' taste, as they refer to it, in your bread. Basically meaning it will dry out and not taste as good.
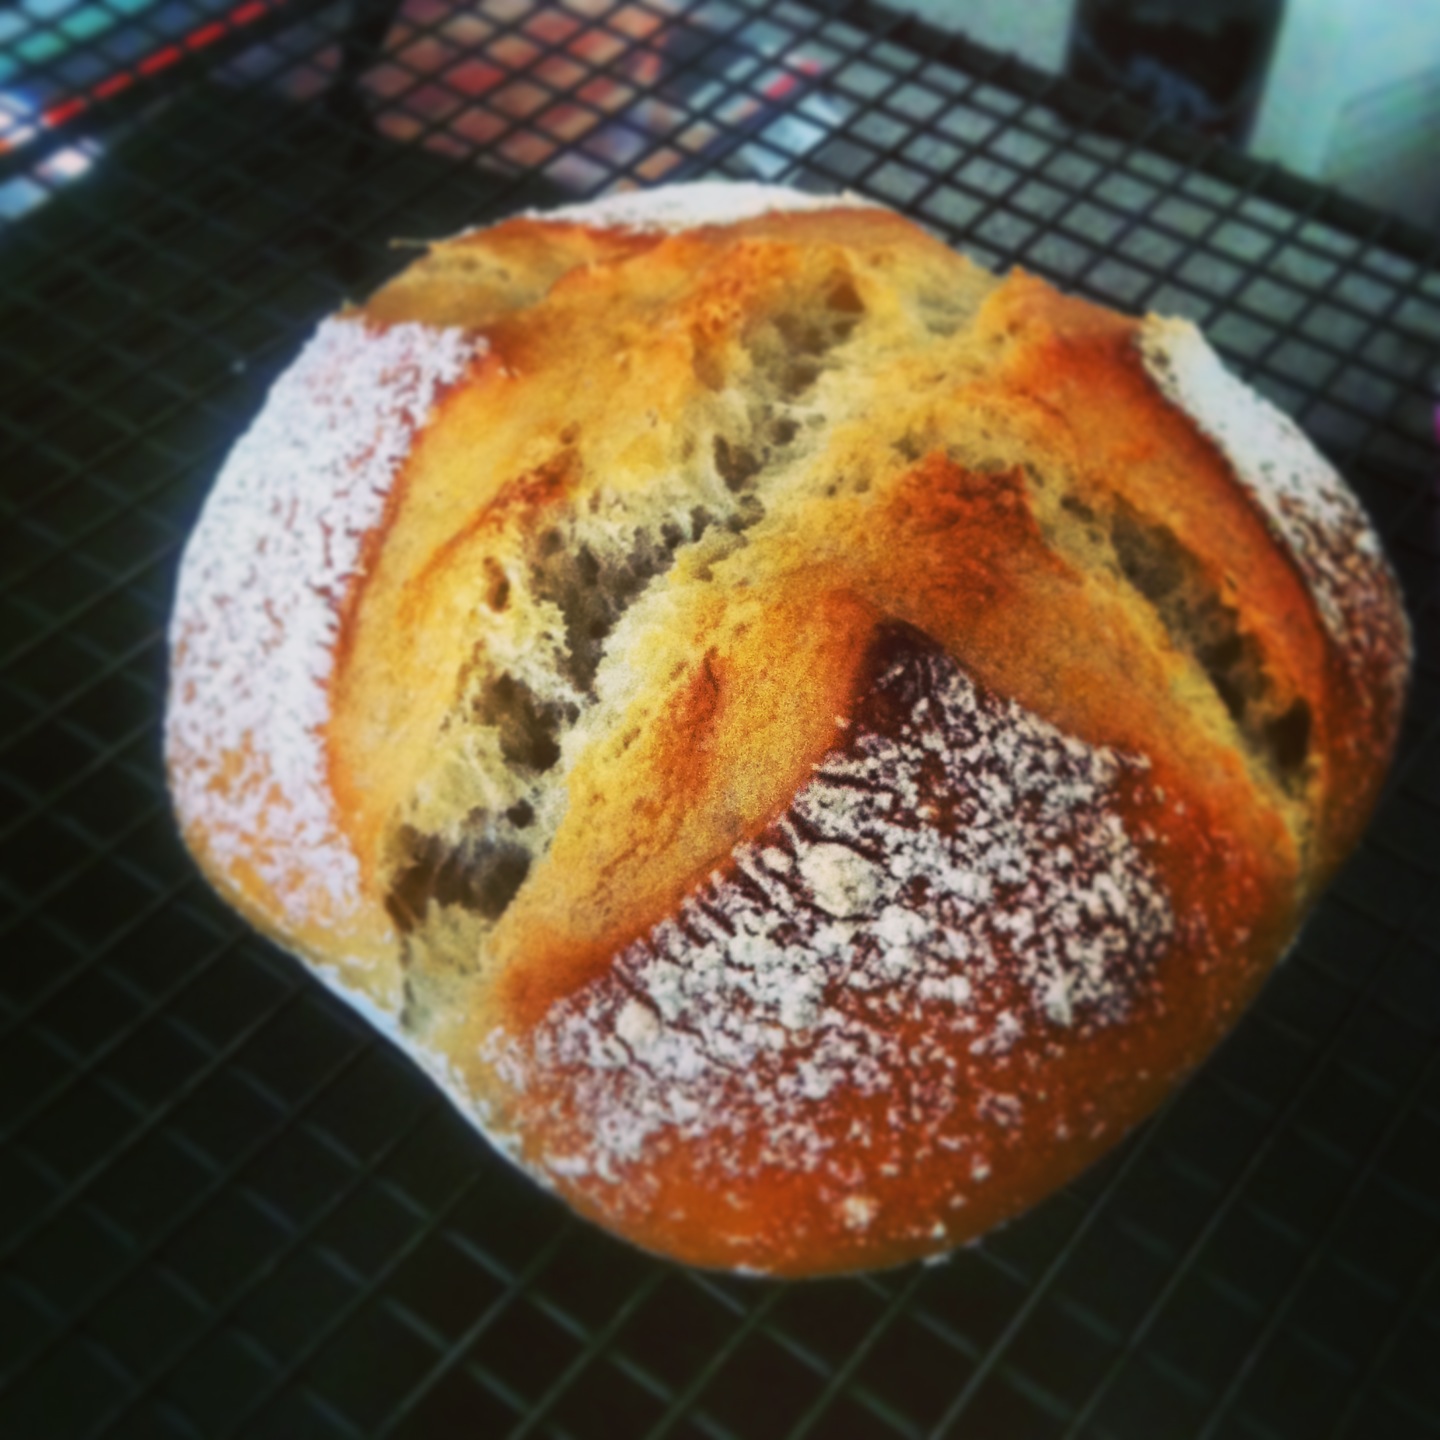
I was so impressed when I pulled my loaf out and it was this beautiful golden brown beauty. It looked like it came straight from a fancy bakery. The crust was crispy and crackling. The house smelled wonderful. I waited for what seemed like forever for it to cool. Once cool I sliced off a piece to reveal what was a beautifully moist, custard like, center with a nice chewy/crisp crust. I slathered some butter on it and it was one of the best breads I had ever tasted!

So overall I am a huge fan of this book. I know it may be a bit misleading on the 5 minutes part. But honestly the dough mixed up in 10 minutes or less and once you have that container of dough in the fridge it takes nothing to break a piece off, shape it and bake it. This truly gives you a way to have fresh bread daily. And once you form it you basically are free to do anything else while it rests and bakes. Their book goes into sandwich breads, ryes, pitas and flatbreads, pizzas, sweet rolls, cinnamon rolls, as well as a variety of flavored breads with grains, seeds, and other additions. I was surprised at how easy it was and immediately went and bought the book on Amazon! (Click on that link to go directly to the book) $16 for the hardcover and as little as $6.99 for your Kindle. They also have a website, http://www.artisanbreadinfive.com/, that has a blog with different recipes, videos on the actual 5 minute process and more. Highly recommended and homemade bread is cheap, so a great way to save money and feel better about what you are eating!
“Good bread is the most fundamentally satisfying of all foods; and good bread with fresh butter, the greatest of feasts.” – James Beard
No comments:
Post a Comment